Text-to-Image Workflow Comparison: ComfyUI vs Pixelflow
Explore how ComfyUI and PixelFlow can be used for building stable diffusion workflows. This blog post provides a side-by-side comparison of a simple text-to-image workflow on both GUI's.

If you are someone working in open-source generative image models, like Stable Diffusion, you may have already heard of ComfyUI. It is a well-loved open-source, node-based GUI (Graphical User Interface) that’s perfect for building stable diffusion workflows. It’s powerful and flexible, but let’s be honest, it can be a bit of a tough nut to crack for beginners.
Pixelflow is also a node-based GUI, developed by the Segmind team, and is similar to ComfyUI. But here’s the kicker - it’s incredibly user-friendly! Pixelflow standing on the shoulders of the giants like ComfyUI, has become a platform where beginner users can hit the ground running immediately.
This blog post puts ComfyUI and Pixelflow head-to-head. We'll focus on a simple text-to-image workflow, comparing the ease of use and the number of nodes needed in each platform. We'll also touch on the basics of building a workflow in both interfaces.
Text to Image Workflow in ComfyUI
Lets take a look at the nodes required to build the a simple text to image workflow in ComfyUI.
- Load Checkpoint: This node is used to load a diffusion model. Diffusion models are used to denoise latents. This node also provides the appropriate VAE and CLIP model.
- Clip Text Encode (for Positive and Negative Prompts): These nodes are used to encode a text prompts using a CLIP model into an embedding that can be used to guide the diffusion model towards generating specific images. One for the positive prompt and one for the negative prompt.
- Empty Latent Image: This node is used to create a new set of empty latent images. These latents can then be used inside a text-to-image workflow by noising and denoising them with a sampler node.
- KSampler: The KSampler node uses the provided model or checkpoint and positive and negative conditioning to generate a new version of the given latent. First, the latent is noised up according to the given seed and denoise strength, erasing some of the latent image. Then this noise is removed using the given model and the positive and negative conditioning as guidance.
- VAE Decode: This node is used to decode latent space images back into pixel space images.
- Save Image/Preview Image: The Save Image node is used to save images. Alternatively, to simply preview an image inside the node graph, use the Preview Image node.
To create a simple text-to-image workflow, you would connect these nodes in the order listed above. You start by loading a checkpoint, then encoding your text prompts (both positive and negative) with the Clip Text Encode node. You then create an empty latent image, which you pass through the Ksampler along with the encoded text and the model from the checkpoint. The output of the Ksampler is then decoded back into an image using the VAE Decode node. Finally, you can either save the resulting image using the Save Image node or preview it directly in the ComfyUI interface using the Preview Image node.
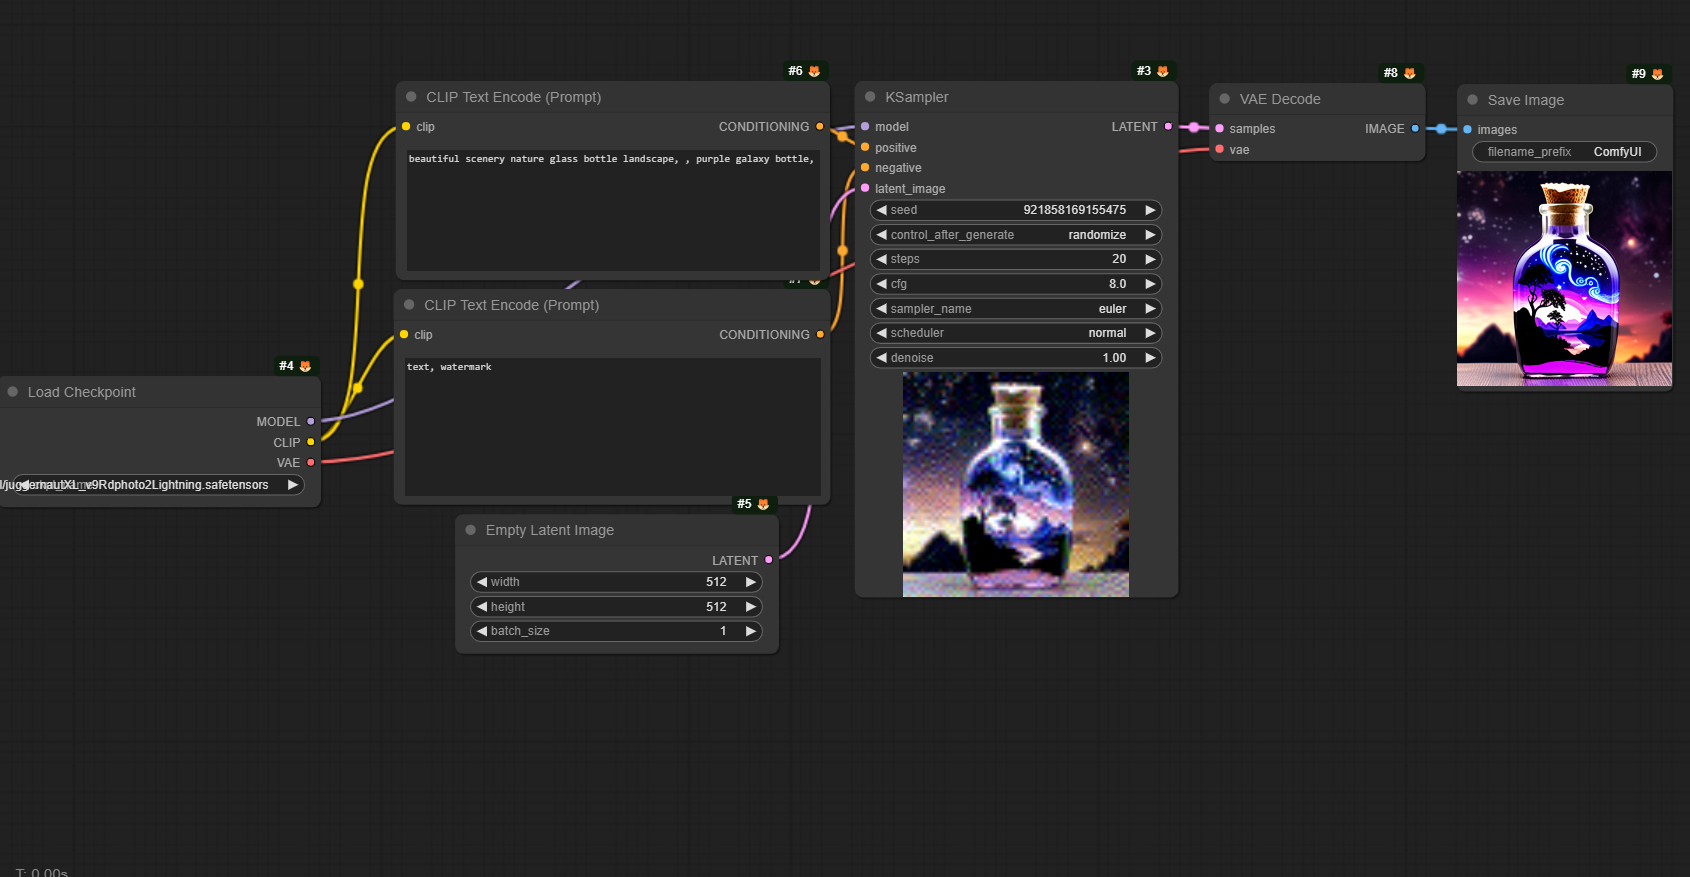
As you can see, there are quite a few nodes (seven!) for a simple text-to-image workflow. Now, let’s see how PixelFlow stacks up against ComfyUI.
Text to Image Workflow in Pixelflow
Lets take a look at the nodes required to build the a simple text to image workflow in Pixelflow.
- Text Input Node: This is where you input your text prompt. The text you input here will guide the generation of the image.
- Model Node: This is the core of the workflow. It’s similar to the Load Checkpoint node in ComfyUI, but it’s more comprehensive. It includes functionalities of several nodes from ComfyUI such as CLIP text encode, empty latent image, KSampler, and VAE Decode. This node takes the text input, encodes it, generates an empty latent image, samples it using the KSampler, and then decodes it back into an image.
- Image Output Node: This is where the generated image is outputted. You can view the final result here.
To create a simple text-to-image workflow in PixelFlow, you would connect these nodes in the order listed above. Start by inputting your text prompt in the Text Input Node. Then, connect this node to the Model Node. The Model Node will process the text input and generate an image. Finally, connect the Model Node to the Image Output Node to view the generated image. It’s a straightforward and pretty easy to generate an image.
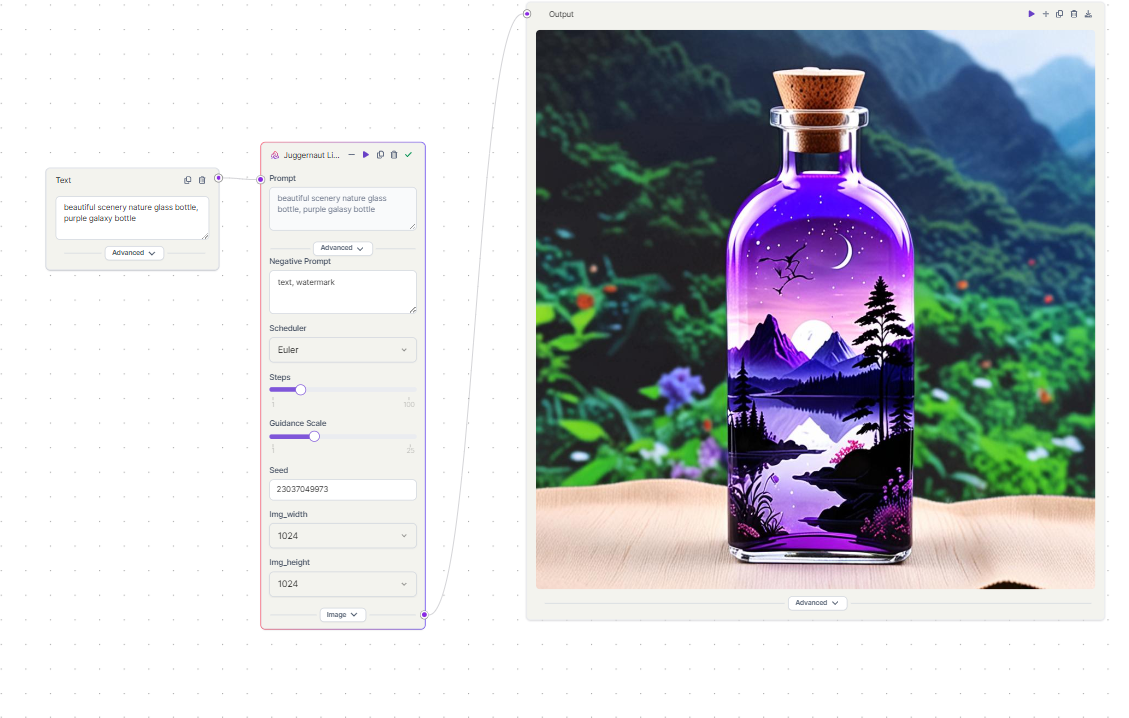
As you can see, we managed to build a workflow with just 3 nodes as compared to 7 nodes in ComfyUI. Actually, we can even skip the text input node as the model node has both positive and negative prompts.
If you are a beginner or someone looking to build stable diffusion workflows quickly, give PixelFlow a try. You will love it. Our early adopters certainly have. We are continuously improving it, refining it, and adding more features to make it best in class.
Become a part of the vibrant Pixelflow Community by joining our Discord server, where you can collaborate, create, and share innovative stable diffusion workflows.