ComfyUI Workflow for Composition Transfer with IP Adapter Plus
Explore the power of ComfyUI and Pixelflow in our latest blog post on composition transfer. Learn how we seamlessly add elements to images while preserving the important parts of the image.

This blog post dives into two powerful tools, ComfyUI and Pixelflow, to perform composition transfer in Stable Diffusion. We will show you how to seamlessly change how an image looks and its layout, but still keep the important parts the same.
Composition Transfer workflow in ComfyUI
To execute this workflow within ComfyUI, you'll need to install specific pre-trained models – IPAdapter and Depth Controlnet and their respective nodes. The IP Adapter lets Stable Diffusion use image prompts along with text prompts. The Depth Preprocessor is important because it looks at images and pulls out depth information. This helps it understand the space in the original scene better. Together, these models help create images by mixing elements from the original image and the image prompt, guided by the text prompt.
Let’s look at the ComfyUI nodes used for composition transfer:
| Node Name | Functionality |
|---|---|
| Load Checkpoint | Loads a Stable Diffusion model for image generation. |
| Clip Text Encode | Encodes positive and negative text prompts to guide the image composition. |
| K-Sampler | Core image generation node. Takes model, prompts, and latent image for iterative refinement. |
| VAE Decode | Decodes the latent image generated by K-Sampler into a final image. |
| Load Image (Composition) | Loads a reference image defining the desired composition for the final image. |
| Load ControlNet | Loads a ControlNet model for processing the composition image. |
| Zoe Depth Map (Optional) | Processes the composition image to improve depth information (optional). |
| Apply ControlNet (Advanced) | Connects the processed composition image and conditioning inputs to the K-Sampler. |
| Empty Latent image | Loads a noised latent image to the K-Sampler. |
Now that we know the nodes we will be using in the work, lets deep dive into the actual workflow.
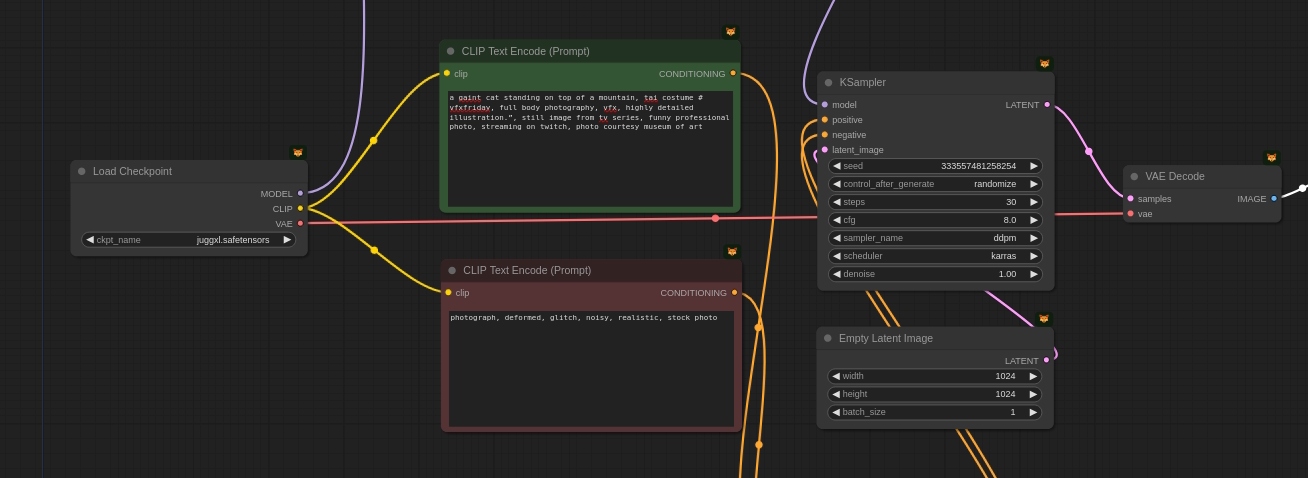
First, you'll load the core Stable Diffusion model and supporting components using a "Load Checkpoint" node. Text prompts come next, defined through "Clip Text Encode" nodes. These describe what you want (positive prompts) and what to exclude (negative prompts).
We use an "Empty Latent" node here instead of an existing image. This creates a blank canvas for your composition. An image is then refined through a "K Sampler" node that combines the model with prompts and refines it based on a random seed and denoising strength. Finally, a "VAE Decode" node translates the refined image from a hidden space into a viewable picture.
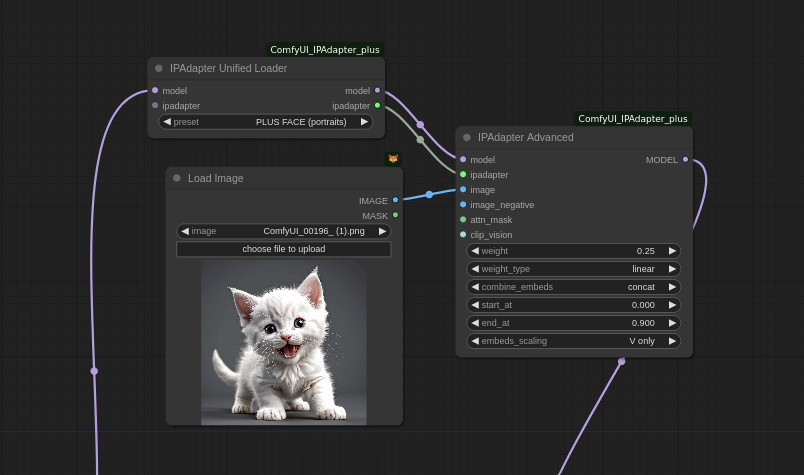
You can then add a style reference. A "Load Image" node brings in a separate image for influencing the generated image. Then, an "IPAdapter Advanced" node acts as a bridge, combining the IP Adapter, Stable Diffusion model, and components from stage one like the "K Sampler".
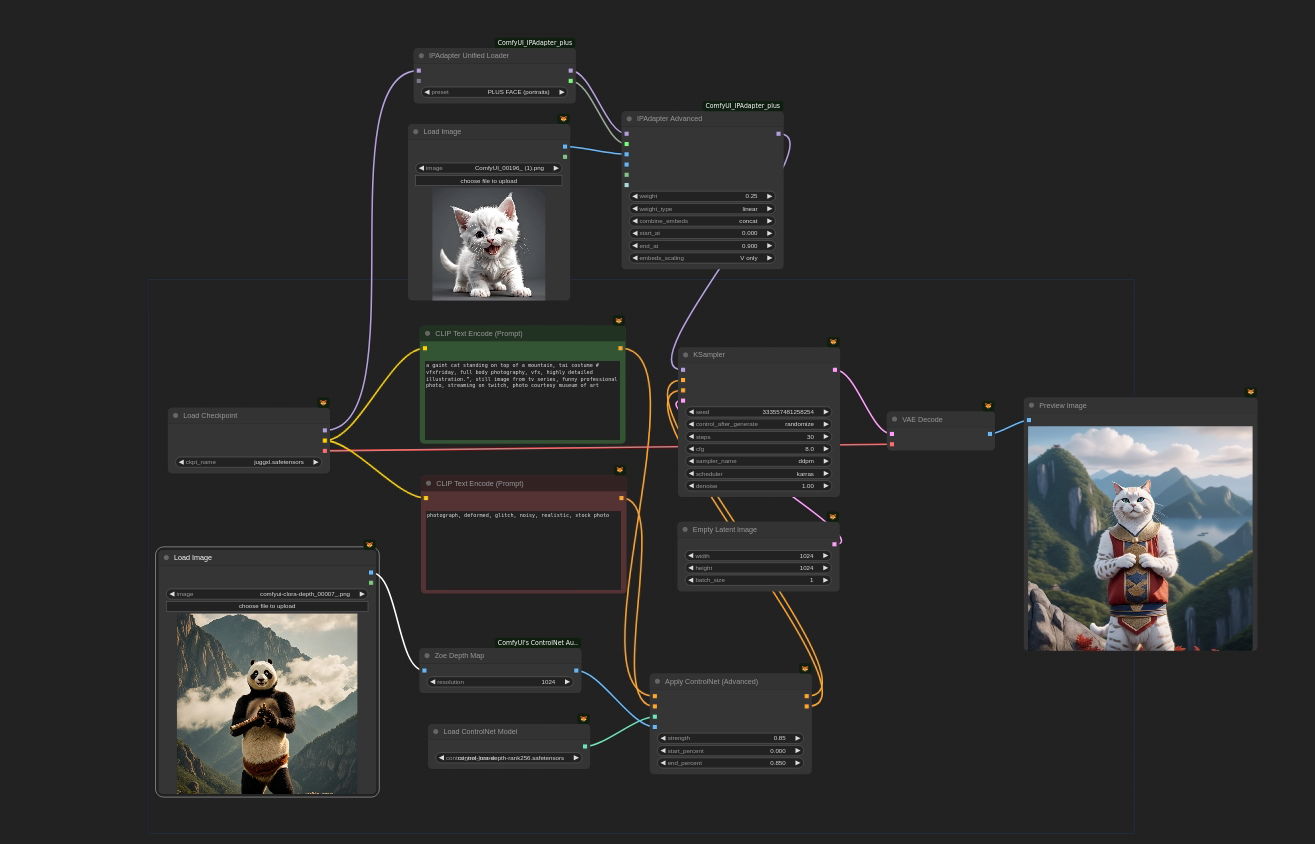
Another "Load Image" node introduces the image containing elements you want to incorporate. A series of nodes ("Load ControlNet", "Zoe Depth Map", and "Apply ControlNet") work together to define how this composition image is integrated. Imagine these nodes as tools for positioning and blending elements from the composition image.

After defining how the composition image integrates, you'll connect all the nodes in the specific order provided by ComfyUI (often shown visually in example workflows). This creates a complete workflow that you can then execute to generate the final image.
ComfyUI lets you fine-tune the process by adjusting parameters within certain nodes, like the strength of the composition influence. Feel free to experiment with these settings to achieve your artistic vision!
Composition Transfer workflow in Pixelflow
Pixelflow has specialized node to replicate the above Comfy UI workflow. The IP-adapter Depth XL model node does all the heavy lifting to achieve the same composition and consistency.

First, choose an image with the elements you want in your final creation. Drag and drop it into the "Input Image" area. Bonus: you can use the same image and text prompts you already use in the comfy UI workflow!
Next, we add a node called "IP-adapter Depth XL Model" combines several functions under the hood:
- It seamlessly integrates an IPAdapter model with the core image generation model, allowing for smooth composition transfer.
- A built-in depth preprocessor control net ensures precise manipulation of depth information in the final image.
This single node takes care of the complex work, letting you focus on your creativity.
Finally, within the "IP-adapter Depth XL Model" node, you can adjust how much the composition image influences the final output. Finding the perfect balance is key to bringing your artistic idea to life. Once you're happy with your creation, the "Output Image" node displays your generated image. Simply download it for further use and unleash your artistic vision on the world!
Key Take Aways
While ComfyUI offers more granular control through separate nodes, Pixelflow condenses the process into fewer steps, making it more user-friendly for beginners. This is just one example of composition transfer. Both ComfyUI and Pixelflow offer flexibility to explore different creative possibilities through experimentation with various settings and functionalities.
We will be coming up with more such blogs on this to show you more possibilities and ways of using this tools.