Simple Steps to Swap Faces in Photoshop Using AI
Select subjects, use Marquee & Move tool to select and adjust faces, then blend them using layer opacity for a natural photoshop face swap.

Learning Photoshop face swap helps create unique visual effects for fun or professional projects. This technique lets you take a face from one image and blend it into another, giving you plenty of creative options. Face swapping is excellent for simple photo edits or more advanced design work, making it a popular tool in image editing.
How to do a Photoshop face swap with tools like the Marquee Tool for selecting faces, the Move Tool for resizing and positioning, and layer opacity for smooth blending make the process easier and more natural. For those looking for a faster, automated solution, Segmind’s Face Swap AI provides an excellent alternative, delivering polished results with minimal effort for both photos and videos.
How to Do a Photoshop Face Swap Using the Marquee Tool?
To do a Photoshop face swap using the Marquee tool, start your Photoshop face swap by selecting the face you want to swap using the Marquee Tool. Choose the rectangular or elliptical Marquee option, depending on the shape of the face.
Carefully outline the face, ensuring the selection is clean and accurate for a smooth swap. Once you've selected it, copy it onto a new layer to begin the next steps in the face swap process.
How do you resize and position faces with the Move Tool?
To resize and position faces with the Move tool, you need to paste the face; after pasting the face onto a new layer, use the Move Tool to position it accurately. Ensure the face aligns naturally with the original image. To resize the face:
- Hold Shift to maintain the aspect ratio.
- Drag the corners to adjust the size.
- Use the Arrow keys for precise positioning.
Following these steps will help ensure a smooth, natural-looking face swap in your Photoshop project.

How to Blend Faces with Layer Opacity?
Blending the faces is essential for a natural result when mastering a Photoshop face swap. Adjust the layer opacity of the face layer to merge it with the original image seamlessly.
Gradually reducing the opacity allows the facial features and edges to blend with the base layer, creating a smooth transition. Fine-tune the opacity level until the swap looks realistic, ensuring the lighting and textures align perfectly between the two layers.
Key Steps Breakdown for a Successful Photoshop Face Swap:
To master how to do a Photoshop face swap, follow these steps for a smooth and realistic result:
1. Select Your Images
Begin by choosing two clear, well-lit images with which the faces are easy to work. This will ensure a more natural-looking face swap and simplify the editing process.
2. Select the Faces with the Marquee Tool
Depending on the face's shape, use the Rectangular or Elliptical Marquee Tool to make an accurate selection. Carefully outline the face you want to swap, ensuring the selection is precise and clean.
3. Copy and Paste the Faces onto a New Layer
Copy and paste the face onto a new layer once you've selected the face. This allows you to manipulate the face independently, giving you more control over the editing process.
4. Use the Move Tool to Resize and Position the Faces
With the Move Tool, resize and align the new face to fit the original subject. Hold Shift to maintain the aspect ratio while resizing, and use the Arrow keys for fine adjustments to position the face perfectly.
5. Blend the Faces by Adjusting Layer Opacity
Adjust the layer opacity to blend the new face smoothly with the original image. Gradually lowering the opacity helps the facial features integrate seamlessly. Fine-tune the lighting, shadows, and textures for a natural look.
Following these steps, you can create an excellent face swap in Photoshop that looks natural and professional.
How Segmind’s FaceSwap AI Simplifies the Process
In Photoshop, manual face-swapping requires complex selection, resizing, and blending. With Segmind’s FaceSwap AI, this process is automated. The AI instantly identifies faces and swaps them with precise alignment and blending, saving time and effort. Users only need to upload images, and Segmind handles the rest, providing a seamless swap.
Discover Segmind's Powerful Face Swap Tools.
1. Face Swap
The image below showcases Face swap, an advanced tool from Segmind that delivers quick and precise face swapping. It efficiently manages face replacements while preserving natural skin tones, lighting, and facial features.

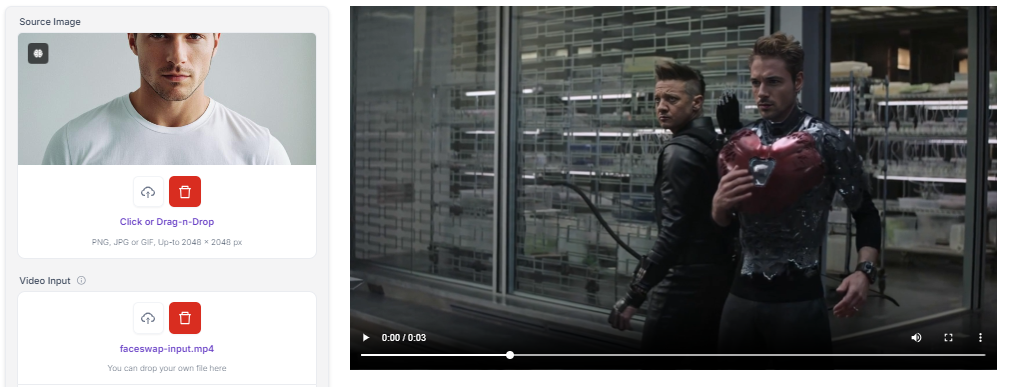
2. Video Face Swap
Segmind’s Video Face Swap tool effortlessly swaps faces within videos. This tool supports one-to-one, one-to-many, and group face swaps, making it perfect for creative projects, marketing, and social media content. With high-quality results and minimal manual effort, it allows for quick and efficient video editing.
3. GIF Face Swap
Segmind’s GIF Face Swap tool makes face swapping easier than ever, offering a user-friendly experience with impressive results. With just a few clicks, you can swap faces in photos or videos while the AI takes care of all the details, ensuring smooth blending, natural expressions, and perfect lighting.

Comparison of Photoshop and Segmind FaceSwap
Creating a comparison between Photoshop and Segmind FaceSwap helps highlight the strengths and differences of each tool. Here’s how to develop a detailed content-based comparison:
- Photoshop: The face swap process in Photoshop involves multiple manual steps. Users will carefully select the face using the Marquee Tool or Lasso Tool. After copying the chosen face, it must be resized, positioned, and blended manually using the Move Tool, layer opacity adjustments, and possibly blending modes to achieve a seamless result.
- Segmind FaceSwap: The process is automated. Users upload the source and target images or videos, and the AI handles the entire face swap process. The technology automatically detects facial features and aligns them, ensuring smooth transitions and natural expressions without manual intervention.
How to Tackle Complex Areas During a Face Swap?
When learning Photoshop face swap, dealing with complex areas like overlapping hair or double ears can be tricky. AI tools can assist by creating smooth transitions in these challenging spots. You can also use the Clone Stamp Tool or Healing Brush Tool to fix imperfections and improve the blend.
- Use AI-generated fill to handle gaps or overlaps.
- Adjust layers and masks for seamless hair blending.
- Apply Photoshop’s Liquify Tool to reshape distorted facial features.
These techniques will help you create a cleaner, more realistic final image. For a faster and more effortless solution, try Segmind’s FaceSwap AI, which tackles even the most complex areas easily and precisely!
Start now and see the difference AI can make in your face swaps.
Conclusion:
Mastering how to do a Photoshop face swap is easy with the proper steps and regular practice. Each step is essential for a smooth result, from selecting faces with the Marquee Tool to resizing and blending them using the Move Tool and adjusting layer opacity. AI tools can also help you handle tricky areas and improve your swaps. With continuous practice, your face swaps will become more natural and professional. Keep experimenting, and you'll soon perfect your Photoshop face-swapping skills!
Segmind also offers a powerful video face swap tool, providing another option for smooth, high-quality face swaps in personal and professional projects. Segmind’s tool excels at handling complex swaps in group videos and offers the added benefit of batch processing, making it perfect for high-volume tasks. With Segmind's FaceSwap AI, you can achieve professional face swaps quickly and effortlessly.
Try Segmind’s FaceSwap AI for fast, flawless face-swapping results!