How to Swap Faces Using ComfyUI ?
Discover the power of face swapping in Stable Diffusion! Our blog post guides you through using ComfyUI and Pixelflow to effortlessly achieve realistic face swaps.

Face swap in Stable Diffusion lets you replace a face in an image with another one. It's like digital photo manipulation, but done with the help of artificial intelligence. In this blog post, we will focus on two popular tools: ComfyUI and Pixelflow, and how they can help you achieve realistic face swaps with minimal effort.
Before diving in, it's crucial to emphasise responsible use. These techniques are powerful, but creating inappropriate or disrespectful content of real people or celebrities is strongly discouraged.
ComfyUI Face Swap Workflow
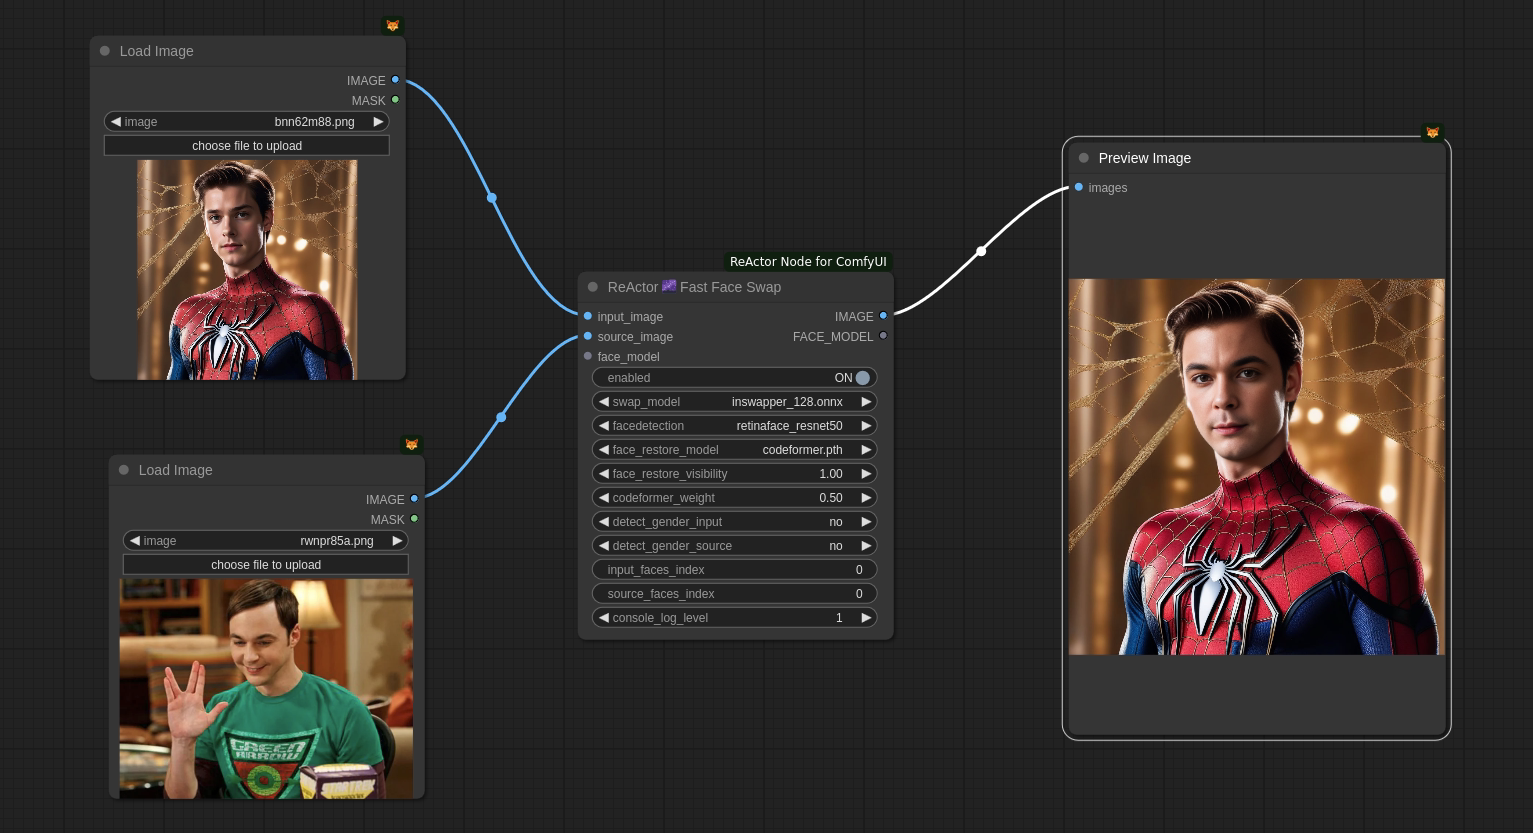
Although there are many methods to do Face Swap in ComfyUI we will be looking at the ReActor method in this workflow. Get started by installing the ReActor Node for ComfyUI, developed by Gourieff. You'll also need additional models for face detection, swapping, and restoration.
Let's look at the nodes used for this workflow:
So we will first add two Load image nodes to the workflow because you'll need two images: the first containing the face you want to swap (source face), and the second, the target image where the swapped face will appear. Then add the ReActor Fact Face Swap node and connect the source face image to the "source_image" input in the ReActor node and connect the target image to the "input_image" input. Although the workflow is simple but you need to understand the different components that make up the ReActor Fast Face Swap node. This node is designed for fast face swapping in images. It utilizes pre-trained models to handle various aspects of the swapping process:
- Face Detection: It identifies faces within the images. The recommended setting is retinaface_resnet50.
- Face Swapping: It performs the core operation of swapping faces between the source and target image. The recommended setting is inswapper_128.onnx.
- Face Restoration (Optional): It can improve the quality and resolution of the swapped face, especially if the source image is low quality. The recommended setting CodeFormer.
Optionally, enable gender detection or specify the face source if you're dealing with multiple faces in an image. Make sure all the additional models are downloaded and placed in the designated folder (refer to the Reactor Node GitHub repo for details) Connect the nodes following the example image provided and change your face and target image according to your requirement.

By following these steps, you'll be able to create realistic face swaps using ComfyUI's Reactor Node. Remember, proper model installation is crucial for this workflow to function correctly. Feel free to experiment with different settings to achieve the best results for your project.
Pixelflow Face Swap Workflow
Pixelflow offers a straightforward approach to face swapping. Here's how it works:

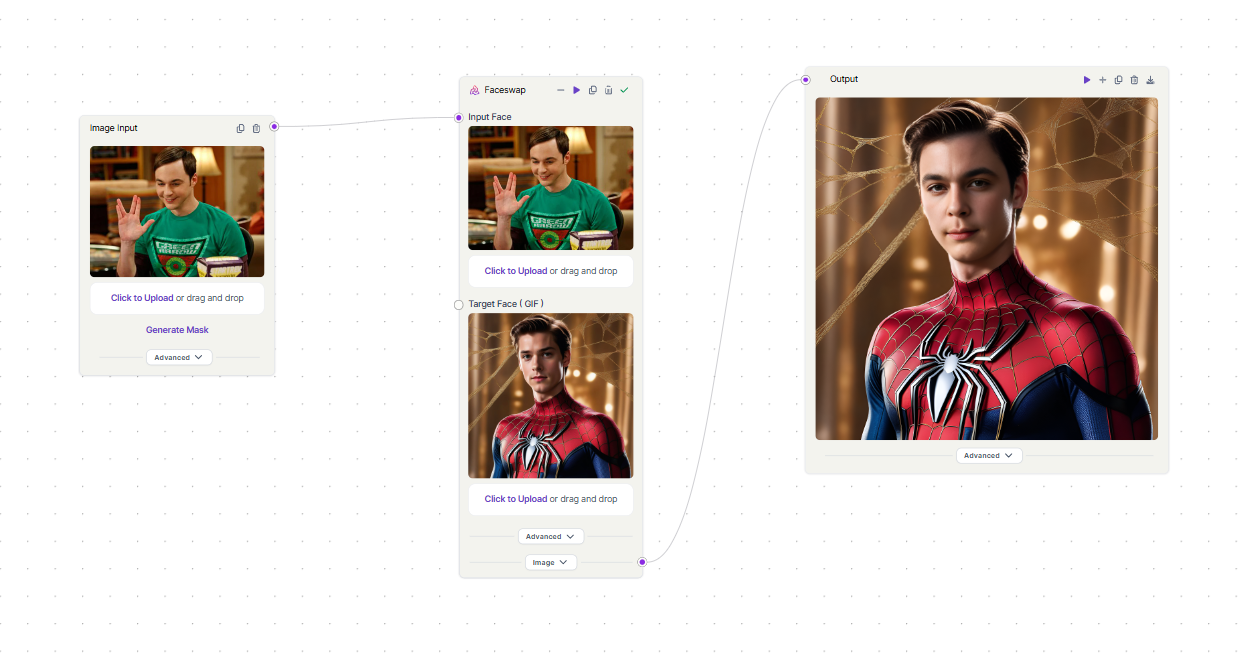
Similar to our ComfyUI workflow we will use the "Input Image" node to import the source face image. This image contains the face you want to swap. Then we add the target image into the "Target Face'' section of the Faceswap node. This is the image where the swapped face will appear.
That's it! Pixelflow takes care of the rest. The Faceswap node utilises pre-optimized settings for all the necessary models and parameters, ensuring a seamless workflow. Use the "Output Image" node to view and download the final image with the swapped face. Pixelflow makes face swapping accessible and efficient. You can experiment with various source and target image combinations to create unique results. You can see how we have used multiple target face image and achieved the face swap consistently

Key Takeaways
This blog post explored two popular tools for achieving realistic face swaps: ComfyUI and Pixelflow. ReActor streamlines the face swapping process, allowing you to achieve impressive results with minimal configuration. Remember, using these tools ethically is crucial. Avoid creating inappropriate content of real people or celebrities.
We'll be exploring more exciting workflows with these tools in future posts. Also check out our guides on style transfer and composition transfer. Stay Tuned for More!

