Build an Image Generation Web Application with Stable Diffusion API
A simple guide to build your own image generation app using Segmind stable diffusion API and deploy it on Replit.

Stable Diffusion is a text-to-image model that can generate photorealistic images from text descriptions. Unlike other text-to-image models, it ensures stability and realism by gradually refining a random noise image until it matches the given text. This open-source model is freely available for anyone to use, allowing artists, researchers, and imaginative individuals to bring their ideas to life. With Stable Diffusion, the possibilities are endless, as it can generate images of anything you can imagine. In this tutorial, we will be a making simple web app that allows users to enter an image prompt and then generate the image using Stable Diffusion. We will be using Segmind's Stable Diffusion API for this tutorial.
Creating the Web Application
Before we begin, you should have the following things set up:
- A Segmind account. You can sign up for a free account at segmind.com.
- Python installed on your computer.
- Flask to make API request
- Replit account to deploy the web application
In this tutorial, we will embark on a journey to create a dynamic image viewer web application. The purpose of this web app is to allow users to input text prompts, select a model, and view the generated images in real-time. We’ll break down the code step by step, from the HTML structure for the front end to the JavaScript for user interactions, and the Python back end that generates images.
Open up your favourite code editor and initialize the following files and folders in the below order:
project
│───static
     |───script.js
     |───styles.css
     |───(all images)
|───templates
     │───index.html
└───main.py
Frontend
In the frontend section, we'll focus on the part of web development that users see and interact with directly. This includes the design, layout, and functionality of the website.
The HTML structure comprises a sidebar with input fields for prompts, and a model selection section. The image container is where the generated images will be displayed.
The body contains two primary divisions:
- Sidebar: This holds user inputs, including image prompts, and model selection.
- Image Container: Here, the generated image is displayed.
Note: We are using url_for('static') to ensure correct relative import paths in Flask for static assets such as images and stylesheets, ensuring correct paths across deployments.
Create a new file named as index.html inside a folder named as templates and paste the following the code in it:
<!DOCTYPE html>
<html lang="en">
 <head>
   <meta charset="UTF-8" />
   <meta name="viewport" content="width=device-width, initial-scale=1.0" />
   <title>Image Viewer</title>
   <link rel="stylesheet" href="{{ url_for('static',filename='styles.css') }}"/>
 </head>
 <body>
   <div class="sidebar">
     <h2>Stable Diffusion</h2>
     <label for="prompt">Prompt:</label>
     <input type="text" id="prompt" placeholder="A toy panda standing on a pile of broccoli" />

     <label for="negative-prompt">Negative Prompt:</label>
     <input
       type="text"
       id="negative-prompt"
       placeholder="text, cropped, out of frame, worst quality"
     />

     <button onclick="fetchImage()">Show Image</button>

     <h3>Select Model</h3>
     <div class="model-selection">
       <img
         src="{{url_for('static', filename='SDXL.gif')}}"
         alt="SDXL"
         class="model-selected"
         api_link="sdxl1.0-txt2img"
       />
       <img
         src="{{url_for('static', filename='Copax Timeless.gif')}}"
         alt="Copax Timeless SDXL"
         api_link="sdxl1.0-timeless"
       />
       <img
         src="{{url_for('static', filename='Dreamshaper SDXL.gif')}}"
         alt="Dreamshaper SDXL"
         api_link="sdxl1.0-dreamshaper"
       />
       <img
         src="{{url_for('static', filename='IKEA Instructions SDXL.gif')}}"
         alt="ikea-instructions-lora-sdxl"
         api_link="ostris-ikea-instructions-lora-sdxl"
       />
     </div>
   </div>

   <div class="image-container">
     <img id="display-image" src="{{url_for('static', filename='small_sd.webp')}}" alt="Image Display" />
   </div>

   <script src="{{ url_for('static',filename='script.js') }}"></script>
 </body>
</html>
Now that the HTML structure is complete, we write the JavaScript code responsible for selecting a model, and fetching the image based on user input. Create a file named script.js in the static folder and paste the following code:
document.addEventListener("DOMContentLoaded", () => {
  const modelImages = document.querySelectorAll(".model-selection img");

  modelImages.forEach((modelImage) => {
    modelImage.addEventListener("click", (event) => {
      event.target.classList.add("model-selected");
      modelImages.forEach((image) => {
        if (image !== event.target) {
          image.classList.remove("model-selected");
        }
      });
    });
  });
});

function fetchImage() {
  const promptText = document.getElementById("prompt").value;
  const negativePromptText = document.getElementById("negative-prompt").value;
  const model = document
    .querySelector(".model-selected")
    .getAttribute("api_link");

  console.log("Prompt:", promptText);
  console.log("Negative Prompt:", negativePromptText);
  console.log("Model:", model);

  fetch("/api", {
    method: "POST",
    headers: {
      "Content-Type": "application/json",
    },
    body: JSON.stringify({
      prompt: promptText,
      negativePrompt: negativePromptText,
      model: model,
    }),
  })
    .then(function (response) {
      if (response.ok) {
        return response.blob();
      }
      throw new Error("Network response was not OK.");
    })
    .then(function (imageBlob) {
      var imageUrl = URL.createObjectURL(imageBlob);
      document.getElementById("display-image").src = imageUrl;
      document.getElementById("display-image").alt = promptText;
    })
    .catch(function (error) {
      console.log("Error fetching image:", error);
      alert("Error Generating Image");
    });
}
After the JS code, we write the CSS code providing the styling for the web application. Create a file named styles.css in static folder and use the following code:
body {
    margin: 0;
    padding: 0;
    font-family: "Open Sans", sans-serif;
}

.sidebar {
    float: left;
    width: 25%;
    height: 100vh;
    background-color: #f1f1f1;
    padding: 20px;
    box-sizing: border-box;
}

.sidebar h2 {
    margin-top: 0;
}

.sidebar label {
    display: flex;
    justify-content: space-between;
    margin-bottom: 5px;
}

input[type="range"] {
    width: 100%;
}

#height-value,
#width-value {
    display: inline-block;
    width: 100%;
    text-align: right;
}

.sidebar input {
    width: 100%;
    padding: 10px;
    border-radius: 5px;
    border: 1px solid #ccc;
    box-sizing: border-box;
    margin-bottom: 10px;
}

.sidebar button {
    background-color: #4CAF50;
    color: #fff;
    border: none;
    padding: 10px;
    border-radius: 5px;
    cursor: pointer;
    width: 100%;
}

.sidebar button:hover {
    background-color: #45a049;
}

.image-container {
    float: left;
    width: 70%;
    height: 100vh;
    display: flex;
    align-items: center;
    justify-content: center;
    overflow: hidden;
    box-sizing: border-box;
    padding: 20px;
}

#display-image {
    max-width: 100%;
    max-height: 100%;
}

.row {
    display: flex;
    flex-direction: row;
    justify-content: space-between;
    align-items: center;
}

.sidebar span {
    margin-left: 10px;
}

.model-selection {
    display: grid;
    grid-template-columns: repeat(2, 1fr);
    grid-gap: 5px;
}

.model-selection img {
    width: 95%;
    height: auto;
    cursor: pointer;
    margin: 6px;
}

.model-selected {
    border: 4px solid blue;
}
With this, we have completed designing the frontend part of our website.
Backend
For the backend section, we will be using Flask to handle the Image Generation by making an API request to segmind.com and then passing it back to the javascript function fetchImage in index.html.
Copy paste the following code blocks into a file named as app.py:
Importing Essential Modules
import json
import os
import random
import math
import requests
from flask import Flask, request, render_template
- The
jsonmodule is imported to handle JSON data. osis used for accessing environment variables.randomandmathmodules are imported for random number generation.requestsis essential for making HTTP requests.- We import
Flaskto create our web application, andrequestfor handling incoming requests and data. render_templateis used to render HTML templates.
app = Flask(__name__)
This line creates a Flask application instance called app. The name argument is a special Python variable that represents the name of the current module.
def random_number():
    return math.floor(random.random() * 99999999999999 + 1)
This is a simple utility function that generates a random number between 1 and 99999999999999.
@app.get("/")
def index():
    # Returns index.html
    return render_template("index.html")
This code defines a route for the root URL ("/"). When a GET request is made to the root URL, the index() function is executed. It returns the contents of the index.html file located in the templates folder of the Flask application.
@app.post("/api")
def api():
    # Get the request from Body
    prompt = request.json["prompt"]
    negativePrompt = request.json["negativePrompt"]
    model = request.json["model"]

    print(prompt, negativePrompt, model)

    response = requests.post(
        f"https://api.segmind.com/v1/{model}",
        headers={
            "x-api-key": "YOUR_SEGMIND_API_KEY",
            "Content-Type": "application/json",
        },
        data=json.dumps({
            "prompt": prompt,
            "negative_prompt": negativePrompt,
            "samples": 1,
            "scheduler": "UniPC",
            "num_inference_steps": 25,
            "guidance_scale": 7.5,
            "img_width": 1024,
            "img_height": 1024,
            "seed": random_number(),
        }),
    )

    # Response is image
    return response.content


if __name__ == "__main__":
    app.run(debug=True, host="0.0.0.0", port=5000)
Let's break down and explain the code pointwise:
@app.post("/api"): This is a Python decorator used in Flask to specify that the following function will handle HTTP POST requests at the endpoint "/api." When a POST request is made to this endpoint, it triggers the api() function.
prompt = request.json["prompt"]: This line extracts the "prompt" data from the JSON content of the POST request. The request object contains information about the incoming request, and here we access the "prompt" key from the JSON data.
negativePrompt = request.json["negativePrompt"]: Similar to the previous line, this extracts the "negativePrompt" data from the JSON content of the request.
model = request.json["model"]: This line extracts the "model" data from the JSON content. The "model" indicates which image generation model to use.
print(prompt, negativePrompt, model): This line simply prints the values of "prompt," "negativePrompt," and "model" to the console for debugging and monitoring purposes. It helps developers see the data being processed.
response = requests.post(...): This is a POST request sent to an external API. It uses the requests library to make an HTTP POST request to a Segmind API endpoint. The URL of the endpoint is constructed dynamically based on the "model" value.
headers={...}: This part of the request sets the headers, including the "x-api-key" header that provides an API key for authentication. The "Content-Type" header specifies that the request content is in JSON format.
data=json.dumps({...}): Here, the data to be sent in the request body is prepared as a JSON object. It includes various parameters such as "prompt," "negative_prompt," "samples," "scheduler," "num_inference_steps," "guidance_scale," "img_width," "img_height," and "seed."
Below is an example of what this JSON object might look like:
data = json.dumps({
    "prompt": "A cat playing the piano",
    "negative_prompt": "text, cropped, out of frame, worst quality",
    "samples": 1,
    "scheduler": "dpmpp_2m",
    "num_inference_steps": 25,
    "guidance_scale": 7.5,
    "img_width": 1024,
    "img_height": 1024,
    "seed": 123456789
})
Explanation of the parameters
- prompt: This parameter contains the text prompt for image generation. In the example, it's set to "A cat playing the piano."
- negative_prompt: This parameter defines any negative aspects or conditions for image generation. In the example, it's set to "text, cropped, out of frame, worst quality."
- samples: This parameter specifies the number of image samples to generate. In this case, it's set to 1.
- scheduler: The scheduler parameter determines the image generation schedule. It can vary depending on the chosen model. In this example, it's set to "dpmpp_2m."
- num_inference_steps: This parameter controls the number of inference steps taken during image generation. It's set to 25 in this example.
- guidance_scale: This parameter defines the scale of influence of the prompt on the generated image. A higher value, like 7.5, gives more weight to the prompt.
- img_width and img_height: These parameters specify the width and height of the generated image. In this case, the image dimensions are set to 1024 pixels in width and 1024 pixels in height.
- seed: The seed parameter is used to introduce randomness into the image generation process. It can be any random number, such as 123456789 in this example.
return response.content: After making the POST request to the Segmind API, this line returns the content of the response, which typically includes the generated image. The content is then sent back as the response to the original POST request made to this endpoint.
In summary, this code handles POST requests at the "/api" endpoint, extracts data from the request, sends a request to an segmind API, and returns the response content to the client.
if __name__ == "__main__":
    app.run(debug=True, host="0.0.0.0", port=5000)
This code ensures that the Flask app is only run if the script is executed directly (not imported as a module). It starts the Flask development server with debugging enabled and on port number 5000.
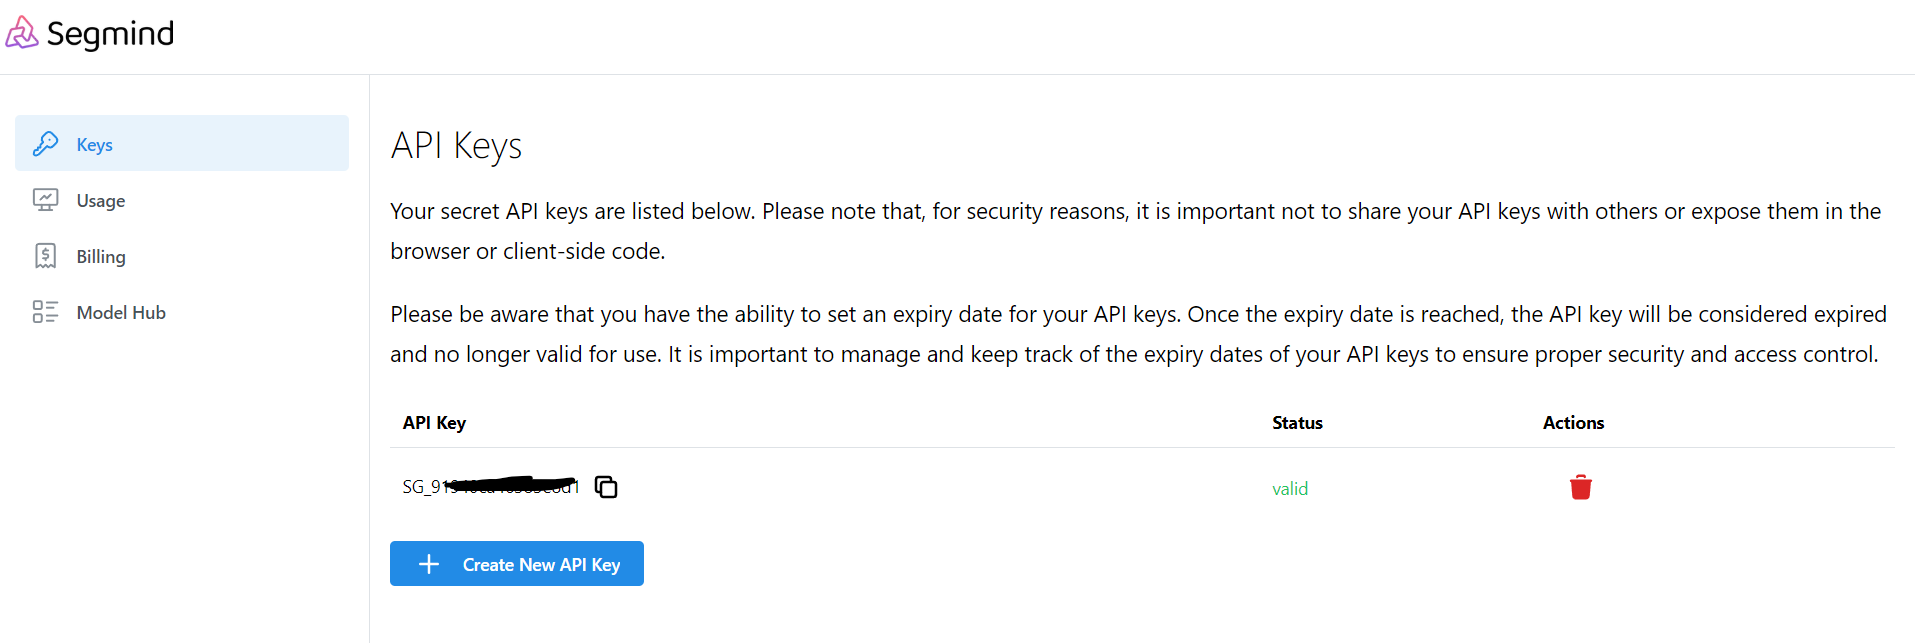
In the code, you need to replace "YOUR_SEGMIND_API_KEY" with your Segmind API key, which can be found here
Though, we hard coded the value of Segmind API Key, you should absolutely try to avoid as you learn web development. You need to use environment variables instead. Feel free to use environment variables at a later part after you fully understand the current project.
Thus, we completed the Backend part of the website and with this, successfully created a simple Stable Diffusion Web App.
We highly recommend checking out the playground to try changing various parameters in the API such as Scheduler, Negative prompt, Number of inference steps etc.
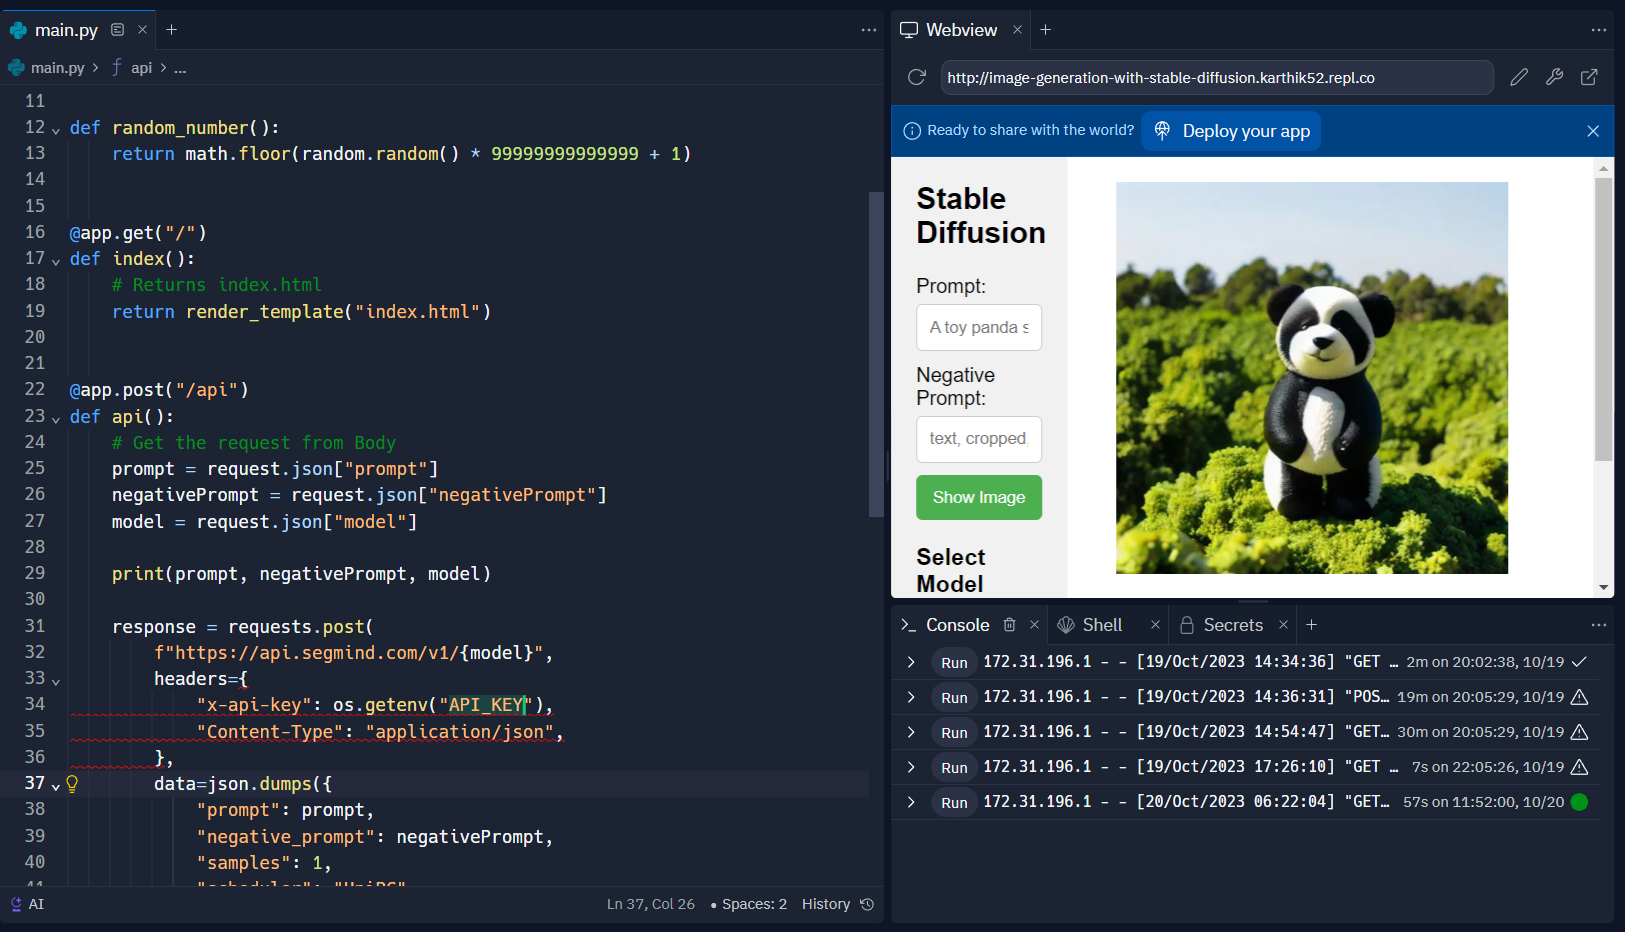
Finally, here is how our app looks like. We have deployed the app on Replit here, feel free to fork it.